Paper Ornaments
This is a great tutorial on how to do the smaller Paper Ornaments that are the rage this season!!!! http://remarkablycreated.com/wp-content/uploads/2012/10/paper_ornamentcontact.pdfWednesday, May 9, 2012
Mid Week!!!!
Will have another drawing shortly, as I have tons of ribbon, and other great gifts!!!
I've had a few of you ask me how I made this quick little treat holder, and for the dimensions....so here is a real quick tutorial.
First you need to start with an 8 X 8" piece of card stock or patterned paper. It is also easier to do if you have the Score Pal with the diagonal score plate.
Score thru the middle on the diagonal, and then score at 1 1/8", flip it around and score the other side at 1 1/8". Now go to the other 2 corners, and score at 2 3/4", flip it and at 2 3/4". This is what it should look like. Fold your 2 triangles that you created last into the center. Flip the thing over, and then fold on the middle so that you have a mountain fold. Fold up on the 2 narrow folds, punch a hole at the top, and tie off with some ribbon. Uses mo adhesive except for the embellishments. This is great for candy , coupons or gift cards!!!
Friday, March 16, 2012
Finally, a Tutorial!!!
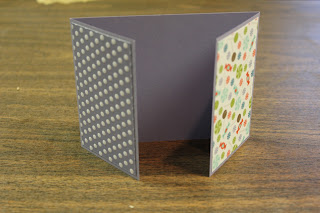
Next you want to score it using the Simply Scored tool, at 2 3/4" and 8 1/4". This will give you your gate fold.
Next, using your choice of designer paper, I used Specialty Sweet Shop, cut two different patterns at 2 1/2" by 4".
Attach to the front or your gates.
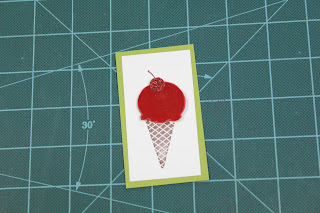
Stamp the ice cream cone from the Mouthwatering Set in the Occasional Mini, in Chocolate Chip Classic Ink on a 1 3/4" by 3 1/4" piece of white cardstock.
On a scrap of Real Red cardstock, stamp the ice cream part of the cone, in Versamark Ink. Using your Powder Pal, sprinkle it liberally with Cherry Scented Emboss Powder. Tap off the excess embossing powder and heat with your heat tool, just until melted(don't burn it!!!)

and mount it onto your cone with a Dimensional.
Using the circle punch from the Itty Bitty Punches Pack, punch out of a
scrap of Red Glimmer paper, a circle, and mount it onto the top of your
cone with your Snail Adhesive.
Layer your cone onto a piece of Old Olive cardstock cut at 2" by 3 1/2".
Attach this piece to the left hand side of your gate, making sure to only use adhesive on the left side of the piece, so that your gate will open.
As with any good gate, you will need to fasten it shut. I used a Library Clip from the Clips Assortment. Way, way too cute...I was skeptical about the Scented Embossing powders...but this one is very cherry...I wanted to eat it!!!! Tonite my Stamper 10 Group meets...so I will post our projects tomorrow.
If there is anything that you see here that you need to get, I can take care of it for you....just contact me!!!!


No comments:
Post a Comment